Videos require plenty of planning and preparation before you hit the record button.
The good news is that it’s easy to create your own office or home recording studio. Here’s how to get started:
Identify your recording space.
Before you start recording, pick a place you find comfortable, convenient, quiet and accessible. Give yourself more space than you think you need, as you may acquire new equipment down the road.
If your recording studio is in your home or at work, try to use interior rooms that are less prone to noisy intrusions.
Mind the acoustics.
Now that you’ve found your recording space, test the acoustics of your room. Sound bounces off walls, so you might not love the initial sound in your recorded video.
However, you can easily adjust your acoustics by filling the room with soft furniture such as a sofa, bean bag chairs or pillows. This will reduce the amount of echo in the room. Another option is to set up acoustic foam.
If you don’t want to spring for furniture or foam, hang blankets on the walls where you’re recording. Tinker and test with different setups to see which sound-diffusion techniques work best for your space.
Gather the gear.
Now that you have a studio you’re comfortable working in, it’s time to get your gear. Here are five essential pieces of equipment:
1. Camera
When it comes to using a camera for a recording, use what you know. There are three options here: a camcorder, a DSLR or your cell phone.
A camcorder is the simplest approach, but certain features may be limited. To get started, however, use what you’ve got.
If you have a camcorder that does basic recording and fits your needs, there’s no reason to buy something new. You can always upgrade recording devices later.
[RELATED: Earn recognition for your captivating videos and visual designs.]
If you are keen to step up your recording game, try a DSLR. A DSLR will shoot sharper videos in low-light situations; will offer multiple lens options for wide, medium and tight shots; and will even have better color balance options. Some DSLRs are limited on how long they can record, so keep that in mind.
The other option is probably already in your pocket. Smartphones have come a long way regarding video and image quality, and your phone might have all the recording power you need. Just get a tripod to hold your phone, hit record, and off you go.
2. Microphones
Audio quality is perhaps the most crucial element of any video, so it’s important to choose a microphone that works for you. Even if your visuals are stunning, your audience will stop watching if the audio is lousy.
Three common types of microphones are:
Lavalier microphones:
- Also known as lav mic, lapel mic or clip mic
- Omni-directional pickup pattern
- Great for one-person interviews
- Easily hidden
- Pick up sounds close by
Shotgun microphones:
- Highly directional
- Great for capturing location sounds and multi-person interviews or panels
- Most connect with XLR cables
Cardioid microphones:
- Also known as handheld mics
- Good at rejecting sounds from other directions
- Commonly used as vocal or speech microphones
Use a microphone that fits your needs—and your budget. If you’d like a list of microphones to start researching, you can listen for yourself here.
3. Studio lights
Casting shadows or washing out your subject(s) with too much light can ruin the quality of your video.
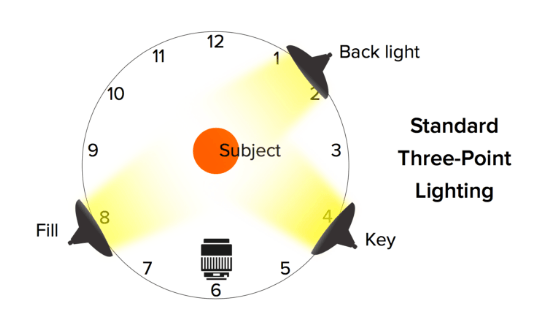
For a video with a single subject, try playing around with three-point lighting design by placing two lights on either side of your subject at 45-degree angles and a third behind or above your subject. This design adds dimension and modulates shadows and contrast, but it still separates the subject from the background.

There are low-budget, mid-range and expensive lighting options. Clamp lights are a cheap way to test which lighting arrangements work best for your DIY recording studio space.
4. Green-screen backdrop
Green-screen backgrounds enable you to replace the real background with a digital one by blending it with your subject. A common example is the weather segment on the news, with the meteorologist standing in front of a map.
Thankfully, green screens don’t have to be fancy or complicated. You can create a DIY green screen by purchasing inexpensive fabric to use as your backdrop. Just make sure that you light your subject separately from your background, and ensure that they are far enough from the green screen to be easily keyed out in post-production.
5. Video editing software
Once you’ve corralled your footage, you can upload it into video editing software to polish up your content. There are plenty of video editing options to choose from, so test several different platforms before settling on the one that’s right for you.
If you keep practicing, testing and sticking with it, you’ll be shooting and editing video like a pro in no time.
Rachel Parker is global content strategy manager at Techsmith. A version of this post first appeared on the Techsmith blog.
(Image via)
from PR Daily News Feed https://ift.tt/2TmqyML
No comments:
Post a Comment