
Updated: 8/31/2018 | August 31st, 2018
Whether as a hobby or profession, starting a travel blog is pretty easy. You can set it up in under 30 minutes. It’s gotten a lot easier than when I started my blog in 2008 when I didn’t know the first thing about making a website. Luckily, on my adventures around the world, I met Matt and Kat, a British couple who also happened to be web designers. When I came home and decided I wanted to start this travel blog, they agreed to help me set it up and teach me HTML. Back then, I hand-coded the website and used a funky tool called Dreamweaver to build it. It was painfully slow, and I wasn’t very good at it. (And my original website was really ugly!)
Luckily, you no longer have to build websites that way. They have gotten a lot easier and simpler thanks to WordPress, a simple out-of-the-box platform designed to make sites easier for those not technically savvy (like myself). It powers over 25% of the internet and is the best platform to start a blog on. It’s super flexible and can do whatever you want it to do — from a simple journal to a complex e-commerce website.
In our blogging course, we’ve had thousands of students start a website on WordPress without any technical skills. They got them up and running — and you can too!
A few months back, I talked about the ways you could succeed with a travel blog, but today, I want to give a quick tutorial on how to create a travel blog from scratch in seven easy steps.
- Step 1: Picking a Name
- Step 2: Signing Up for a Host
- Step 3: Installing WordPress
- Step 4: Setting Up Your Website
- Step 5: Installing Your Theme
- Step 6: Creating Your Main Pages
- Step 7: Joining Our Blogging Course
Step 1: Pick your name
The first thing you need to do is pick a domain name (i.e., your website name). When doing so, there are no hard and fast rules. There’s no such thing as a “wrong domain name,” but there are a couple of rules I like to live by:
- Make a name that can last – If you pick “JohnsAsiaAdeventure.com” and then you leave Asia, the domain name won’t make sense anymore. Make sure you pick a name that isn’t so focused that if you decide to shift gears, you can keep the same domain name.
- Don’t date your blog – Don’t pick something related to your age either. “Twenty-Something Travel” becomes really irrelevant when you get older, which actually happened to a blogger I know. Pick a name that can be used no matter your age!
- Try to avoid certain words like “nomad,” “vagabond,” “wanderlust,” and “adventure.” They have been done to death, and they will make you seem like you’re copying people, not being original.
- Pick a name that describes what you do as much as possible – I was a nomad, so “Nomadic Matt” was the best pick for me. If you’re into luxury, put words in your domain name that convey that. You want people to see the name and go “I get what that website is about.”
- Keep it short – Use 3-4 words maximum. You want the name that rolls off the tongue. Even Ramit Sethi from “I Will Teach You to Be Rich” abbreviates his site to “I Will Teach” or “IWT.” The shorter, the better.
- Keep it simple – I’m not a fan of using jargon or slang in your domain name, as I think that makes things confusing for people who don’t know it. The last thing you want is someone saying, “What does that mean?” or being confused. If someone has to think hard about the meaning, then you’ve already lost them. So don’t try to be clever!
Step 2: Sign up for a host
After you’ve picked out your domain name, you’ll need to register it online and buy hosting (the little computer in the sky that’s going to power your website). There are a lot of basic hosting companies out there — and most of them are pretty terrible. However, the two biggest and best are HostGator and Bluehost. I would go with one of those two.
However, though they are owned by the same parent company, I lean toward HostGator, as I find its call center customer service quicker and friendlier, and HostGator is prone to fewer outages (no one wants their website to go down!). I’ve been using it since I’ve started; I still run my email through it. It’s also really improved its service recently and now offers free SSL certificates (that’s the thing that tells users your website is secure).
Here’s a walk-through of how to set up your host with HostGator (it won’t take long):
First, head over to the website’s sign-up page and get hosting for only $2.78 per month. That’s over 60% off the normal price!

Enter the domain name you picked and then choose the Hatchling Plan. This is the most basic plan, but it’s perfect for new blogs:


I wouldn’t recommend spending more money until you get a lot of traffic and decide you’re going to do this long-term! Additionally, the longer you buy your hosting for, the cheaper it is. If you select three years of hosting, your domain will only cost $127 USD, so I think you should do that. It’s a steal, cheaper than most other hosting packages. You don’t have to pick three years, but the marginal cost of adding additional years is small, and it means you don’t have to worry about renewing for a long time!
That’s it! All that takes about five minutes from start to finish!
Again, you can click here to go to HostGator to set it up.
Step 3: How to Install WordPress
After you’ve registered your domain name and chosen your hosting package, the next thing you’ll want to do is install WordPress. (WordPress is what will actually run the website. The host is simply the computer your site sits on.) WordPress is an open-source and free Web publishing application, content management system (CMS) and blogging tool built by a community of developers and contributors to make it easy for people to blog!
After you’ve paid, you’ll get an email telling your login details. After you click the link in the email and log in, you’ll see this screen. Click “Get Started with WordPress Today”:

You’ll be taken to this screen below. In the dropdown menu, select your domain name and hit “Next”:

Enter your user information. Under the blog title, enter the name of your blog. Create a strong username and then hit install.

Then presto! It’s done!

After your WordPress is installed, a screen will display the username you chose and a password generated for you. (You can change the password later.)
Now your website is up and running.
Step 4: Setting up your website
After you’ve installed WordPress, go to domainname.com/wp-admin and use the username and password you created to log in. You’ll see a screen like this after you log in:
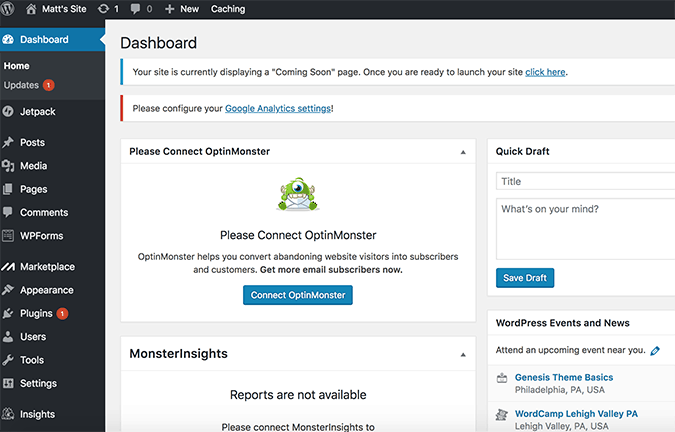
Here’s a little overview of the menu on the left side of the screen:
- Dashboard – The dashboard is the first thing you see when you log in to WordPress, and it’s the main administrative area for your blog.
- Home – This will take you back to the main dashboard view.
- Updates – This area will tell you if WordPress, your plugins, or your theme need to be updated.
- Jetpack – Jetpack is a plugin that allows you to add a spell-checker, contact forms, extra widgets, etc.
- Posts – You can view all your blog posts here, as well as set up new ones and add categories and tags.
- Media – Here’s where you can view your media library and add new media content, like photos and videos.
- Pages – Pages are the individual landing pages on your website (like your About page, Contact page, Resources page, etc.). You can add new pages here as well as review and edit existing ones.
- Comments – Comments on your blog posts go here. You may want to check the spam folder periodically to make sure you’re not missing real comments.
- WPForms – WordPress’s contact-form plugin.
- Marketplace – Here you can create an online marketplace.
- Appearance – This section lets you entirely customize your site’s appearance.
- Plugins – Review, install, and update your plugins here.
- Users – If there’s more than one person accessing your blog, you can create accounts and give them certain privileges here.
- Tools – This section has certain tools to aid you with management tasks.
- Settings – You can adjust all your site’s settings here, including things like your blog title and the size of thumbnails being used.
- Insights – Insights provides traffic and user stats about those visiting your website. (Google Analytics is a better choice, though.)
Plugins are a great way to add additional functionality to a WordPress-powered site. And with over 56,000 (at last check) listed in the WordPress Repository and many more premium options available from developers, there are endless possibilities as to what you can do with your site. (I’ll list some examples below.)
Note: Jetpack, Mojo Marketplace, Insights, and WP Forms are pre-installed plugins.
From the main screen, click Plugins –> Add New on the left-hand column:

Now it’s time for you to install your own.
If you can think of a feature you’d like to have on your site, I can almost guarantee there is a plugin for it, but here are the essential ones for your travel blog:
- Akismet – Just like getting junk mail in your mailbox, your website will get spammers looking to leave junk comments on your site. Akismet seeks to reduce the amount of this by automatically filtering it for you. This plugin comes installed with WordPress, and all you need do is activate it and sign up for an account at akismet.com.
- Yoast SEO – The best SEO plugin out there. This combines the ability to create metatags and descriptions for your posts, optimize your titles, create a sitemap for search engines to read, customize how your posts appear across social media, and a whole lot more. It’s simple and easy to use and comes with foolproof instructions.
- Relevanssi – While WordPress does a lot of things well, what it fails at is adding search functionality to your site. Relevanssi seeks to fix this and give your readers the most accurate results when searching your site.
- Google Analytics for WordPress – Adding analytic tracking to your website is an important way to find out who your readers are, where they are coming from, and what your most popular content is. When you sign up for Google Analytics, the site asks you to place a snippet of code into your website. For most people, that can be difficult, which is why there’s Google Analytics for WordPress. This adds a lovely graphical interface to your site where you can click a couple of buttons and set up your tracking without any hassle.
- Sumo – Free tools to help you grow your site, including the best social sharing plugin on the web. Use this! It comes with great analytics and testing features.
- Jetpack – Jetpack (pre-installed) is aimed at supercharging your website with a host of features from WordPress’s free hosting platform, giving you the best of both worlds. With this plugin, you can add a spell-checker, contact forms, extra widgets, and a whole slew of more features, all with just one plugin.
- W3 Total Cache – This plugin works by creating saved copies of your site, saving WordPress from having to generate them for every new visitor. This, in turn, cuts down on the amount of work your hosting server has to do and makes loading your website much faster.
Step 5: Install your theme
One of the most important things a blog needs besides good content is a good design. People decide in seconds whether or not they trust your website and choose to stay. A visually unappealing website will turn off readers and reduce the number of return visits you get.
So to accomplish a good design, you will need an amazing WordPress theme (i.e., design templates and files).
Luckily, there are lots of out-of-the-box options for you where you can download a predesigned theme, upload it to your website, switch it on, change some settings, and presto! A new look for your website!
You can get:
- Free themes – Free themes are plentiful and for budding new bloggers looking to make their mark online. They seem like a great option, as they allow you to keep costs low. There are many great free themes online, but most of them are not amazing. If you plan on blogging for a long time, this might become a problem as your website grows. However, if you just need a simple design to blog for your friends and family, then go the free route. You can find some good free themes at wordpress.org.
- Premium themes – The next step up from a free theme is a premium theme. Premium themes are paid themes that offer a bit more uniqueness, flexibility, and functionality. These cost $25 USD and up, depending on the developer and features.
I suggest getting a premium theme. Yes, it’s another cost — but here is why you should do it:
- With a premium theme, you almost always get customer support from the developers. If you get in trouble, they are there for you. You don’t get that with a free theme.
- With a premium theme, there are more controls and instructions so they are easier to change. Free themes don’t have that.
- Premium themes tend to be a lot prettier.
- Premium themes are faster and more SEO friendly.
The two best companies for premium themes are WooCommerce and StudioPress. My favorite is StudioPress as it is more SEO friendly, a bit sleeker, and cooler. WooCommerce is great for photographers and more “fun” personal blogs.
To install your theme, simply go to the left-hand column, click Appearance –> Themes –> Upload.
Whatever theme you picked will come as a .ZIP file for you to easily upload. From there, you just activate it, and it’s turned on! All themes come with a manual and help file so you can customize your design to your specific needs.
(If you want a custom logo, two sites to find freelancers are Upwork and 99designs.)
Step 6: Create your main pages
After you’ve uploaded your theme, you’re going to want to make a few basic pages on your website in addition to the blog posts. The difference between a page and a post is that a page is a static piece of content that lives separate from the blog. A post is a blog post that gets “buried” as you write more and more. For example, this post is a blog post. When I update again, another blog post will get put on top of it, and it will be pushed down in the archives, making it harder to find. But a page, like my About page, lives on the top of the website, right near the main URL, and does NOT get buried. It’s a lot easier to find.
To create these pages, go again to your left sidebar and click Pages —> Add New. (For blog posts, use Posts –> Add New.)
I recommend creating four basic pages to start:
- About page – This where you tell people about yourself and your history, what your blog is about, and why it will help them. This is one of the most important pages on your website, so make it personable!
- Contact page – People need a way to reach you! Be sure to be very clear on what emails you will and won’t respond to, so people don’t send you spam.
- Privacy page – This is a standard user agreement page informing readers what the applicable laws on your site are, that you use cookies, etc. etc. You can find out-of-the-box examples throughout the internet.
- Copyright page – This is a standard page letting people know you own this work and not to steal it. You can find out-of-the-box examples of these, too, throughout the internet.
(If you look in my footer, under the “About” section, you can see examples of all four of these pages!)
Step 7: Join our blogging course! (optional)

If you’re looking for more in-depth advice, I have a very detailed and robust blogging course that uses my ten years of blogging knowledge to help you start, grow, and monetize your website. It gives you a behind-the-scenes look at how I run this website and features detailed analytics, tricks, tips, and secrets about what I do. You’ll learn everything I know about creating a successful blog.
I will help you come up with your domain name, sign up for hosting, create engaging content, go viral, network with bloggers, get media attention, master SEO, create products, grow a newsletter, and make money. I will give you the tools for success — and then show you how to use those tools!
Plus, you’ll get over 12 hours of expert interviews, edited feedback on your writing, monthly webinars and Q&As with me (ask me anything!), tech support and help setting up your blog, and a community of bloggers to help you succeed right out of the gate.
I’ll be there every step of the way. I’ll be your personal mentor.
If you’re interested, click here to learn more and get started!
***
That’s it! You’ve set up your basic website. Sure, there are social media buttons to add, blogs to write, images to upload, and things to tweak but all that comes later. Once you do the steps above, you have the framework needed to create and share your story with the world! To recap on how to start a travel blog:
- Step 1: Pick a Name
- Step 2: Sign Up for Hosting
- Step 3: Install WordPress
- Step 4: Set Up Your Website
- Step 5: Install Your Theme
- Step 6: Creat Your Main Pages
- Step 7: Join Our Blogging Course (Optional!)
By following these steps, you can start your travel blog and your stories and tips with the world! (That’s where the real fun begins!)
Disclosure: Please note that some of the links above are affiliate links, including the links for HostGator and Bluehost. At no additional cost to you, I earn a commission if you make a purchase using these links. If you have any questions about the companies or my status as an affiliate, please don’t hesitate to email me.
The post How to Start a Travel Blog appeared first on Nomadic Matt's Travel Site.
from Nomadic Matt's Travel Site https://ift.tt/2NAMksW
ReplyDeleteSHREE SAI PACKERS AND MOVERS
#18/3, 30ft road sri krishna colony kuduregere main road alur, post, Bengaluru, Karnataka 562123
+918073670915
https://shrisaimovers.com/
packers and movers bangalore
packers and movers bangalore
packers and movers bangalore